
Not signed in (Sign In)

News
Vanilla 1.3.0 is a product of Lussumo. More Information: Documentation, Community Support.
-
-
CommentAuthorkrasus
- CommentTimeDec 24th 2009
Hi guys,
I have come to tell you guys how to map with a program called GTK radiant.
you can get the current GTK editor here ---> [url=http://zerowing.idsoftware.com/files/radiant/GtkRadiant-1.5.0.msi]GTK radiant 1.5[/url]
Mirror: ( [url=http://www.qeradiant.com/]http://www.qeradiant.com/[/url] )
Note that the drives I use can be changed to where you want to put the new urt.
[b][color=blue]Step1.[/color][/b]
the first step that I took was to make a copy of my urt folder and call it ut4mapping, this is to make sure that the urt you play doesnt get too full of stuff and you dont lose anything.
[b][color=blue]Step2.[/color][/b]
extract the [color=blue]zpak000.pk3[/color] and [color=blue]zpak000_assets.pk3[/color] to [color=blue]"C:\Program Files\urt41mapping\q3ut4"[/color] by either changing the .pk3 to a .zip at the end or using winzip
[b][color=blue]Step3.[/color][/b]
After GTK is set up put the files listed below:
Maps
Scripts
Textures
Models
Sound
Sounds
env
in [color=blue]"C:\Program Files\urt41mapping\q3ut4\baseq3"[/color]
[b][color=blue]Step4.[/color][/b]
Download the [url=http://teamterrorwtf.com/bludshot/urtmapping/shaderlist.zip]shaderlist.zip[/url] and the [url=http://teamterrorwtf.com/bludshot/urtmapping/urbanterrordef.zip]urbanterrordef.zip[/url] and shove them in [color=blue]"C:\Program Files\urt41mapping\q3ut4\baseq3\scripts"[/color]
[b][color=blue]Step5.[/color][/b]
install and then Configure GTK
- for the game chose choose Quake III Arena/Quake III: Team Arena
- under Edit -> Preferences -> settings change Engine Path to [color=blue]"C:\Program Files\urt41mapping\"[/color]
- under File -> project settings select the mod to be QuakeIII Arena and the fs_game to be q3ut4
[b][color=blue]Step6.[/color][/b]
Now to make your first map...
either go to:
( http://gamedev.digitalamusement.com/mapping/makeitgo.html )
( http://forums.urbanterror.net/index.php/topic,757.0.html )
OR
( http://dejgaming.com]http://dejgaming.com )
OOOOR read on ;)
Follow these steps:
*Start up GTK
*On the grid lines draw a Box as seen in this pic below.
[url=http://www.servimg.com/image_preview.php?i=21&u=13526718][img]http://i82.servimg.com/u/f82/13/52/67/18/map1ro10.jpg[/img][/url]
*Then click on the hollow tool while the box is selected to make a room.
[url=http://www.servimg.com/image_preview.php?i=22&u=13526718][img]http://i82.servimg.com/u/f82/13/52/67/18/map1ho10.jpg[/img][/url]
*Then move the camera into the box by right clicking the 3d view and then moving with the arrow keys. Select the walls by holding shift and clicking them. and then press T to bring up the [color=blue]"Texture Browser"[/color]. click on [color=blue]"abbey2_wall7t2"[/color]
[url=http://www.servimg.com/image_preview.php?i=23&u=13526718][img]http://i82.servimg.com/u/f82/13/52/67/18/map1te10.jpg[/img][/url]
*Now get out of the texture browser by pressing T or Esc (Dont deselect the walls)
Then press S and it will bring up the [color=blue]"Surface Inspector"[/color]
and click under brush "Fit".
[url=http://www.servimg.com/image_preview.php?i=24&u=13526718][img]http://i82.servimg.com/u/f82/13/52/67/18/map1fi10.jpg[/img][/url]
*This leaves the floor and the roof. get out of the surface inspector and deselect the walls. Now select the floor and texture it [color=blue]"abbey2_wood2"[/color]
[url=http://www.servimg.com/image_preview.php?i=25&u=13526718][img]http://i82.servimg.com/u/f82/13/52/67/18/map1gr10.jpg[/img][/url]
*The final step is to texture the roof. Deselect the floor and select the roof. texture it with [color=blue]"abbey2_blinds1"[/color]
[url=http://www.servimg.com/image_preview.php?i=26&u=13526718][img]http://i82.servimg.com/u/f82/13/52/67/18/map1ro11.jpg[/img][/url]
*Thats It with the texturing stage...Now add a spawn point by [color=blue]right clicking -->info -->info_player_start
[/color][url=http://www.servimg.com/image_preview.php?i=27&u=13526718][img]http://i82.servimg.com/u/f82/13/52/67/18/map1pl10.jpg[/img][/url]
*After that its ready ro run in urt...Save the file and call it room1, save it in [color=blue]"C:\Program Files\urt41mapping\q3ut4\baseq3\maps"[/color] . All you have to do now is go to [color=blue]Build --> Q3map2:(single) BSP- meta[/color]
Then go into [color=blue]"C:\Program Files\urt41mapping\q3ut4\baseq3\maps"[/color]
[url=http://www.servimg.com/image_preview.php?i=28&u=13526718][img]http://i82.servimg.com/u/f82/13/52/67/18/map1co10.jpg[/img][/url]
[b][color=blue]Step7.[/color][/b]
Ok now we have to make a pk3...A pk3 is basically a .zip file just with the .zip changed to a .pk3. The pk3 consists of:
[url=http://www.servimg.com/image_preview.php?i=29&u=13526718][img]http://i82.servimg.com/u/f82/13/52/67/18/pk3-fi10.jpg[/img][/url]
A folder with the map name containing:
[color=blue]Map - where you put the .bsp file
Scripts - where you put custom .shader files
Levelshots - where you put the loading screen .tga or .jpg
Textures - Where you put custom textures[/color]
Now all you need here is to shove the .bsp file in the pk3...
select all the folders and then with winrar: Add to archive ---> room1.pk3
or with .zip go to the folder that contains them (room1) and select it. Then send to zip and change the zip extension to a pk3 extension.
[b][color=blue]Step8.[/color][/b]
Now shove [color=blue]room1.pk3[/color] in [color=blue]"C:\Program Files\urt41mapping\q3ut4"[/color] and run urt.
To run your map in urt open the conlsole and type [color=blue]/map room1[/color] then hit enter.
[url=http://www.servimg.com/image_preview.php?i=30&u=13526718][img]http://i82.servimg.com/u/f82/13/52/67/18/map1co11.jpg[/img][/url]
you map should look something like this...
[url=http://www.servimg.com/image_preview.php?i=31&u=13526718][img]http://i82.servimg.com/u/f82/13/52/67/18/map1in10.jpg[/img][/url]
WOW YOUR OWN MAP!
Ty for reading my tut guys
hope you like it...If any pro's see any flaws in this tut please point them out! -
-
-
CommentAuthorpezcadorissimo


- CommentTimeDec 24th 2009
Wow thanks for the post. I've always wanted a step by step guide!
Will check it out once i get a decent desktop that can handle graffix :D
-
-
-
CommentAuthorifly

- CommentTimeDec 24th 2009
I'm going to make an icy map
-
-
-
CommentAuthorRocket

- CommentTimeDec 24th 2009
LOL the forum is html, not BB. But thanks for the guide man.
Actually, I'll just fix it for you =D.
After I take a piss

SubJunk - Rocket teh ninja -
-
-
CommentAuthorRocket
- CommentTimeDec 24th 2009
krasus:Hi guys,
There we go
I have come to tell you guys how to map with a program called GTK radiant.
you can get the current GTK editor here
Mirror
Note that the drives I use can be changed to where you want to put the new urt.
Step1.
the first step that I took was to make a copy of my urt folder and call it ut4mapping, this is to make sure that the urt you play doesnt get too full of stuff and you dont lose anything.
Step2.
extract the zpak000.pk3 and zpak000_assets.pk3 to "C:\Program Files\urt41mapping\q3ut4" by either changing the .pk3 to a .zip at the end or using winzip
Step3.
After GTK is set up put the files listed below:
Maps
Scripts
Textures
Models
Sound
Sounds
env
in "C:\Program Files\urt41mapping\q3ut4\baseq3"
Step4.
Download the shaderlist.zip and the urbanterrordef.zip and shove them in "C:\Program Files\urt41mapping\q3ut4\baseq3\scripts"
Step5.
install and then Configure GTK
- for the game chose choose Quake III Arena/Quake III: Team Arena
- under Edit -> Preferences -> settings change Engine Path to "C:\Program Files\urt41mapping\"
- under File -> project settings select the mod to be QuakeIII Arena and the fs_game to be q3ut4
Step6.
Now to make your first map...
either go to:
( http://gamedev.digitalamusement.com/mapping/makeitgo.html )
( http://forums.urbanterror.net/index.php/topic,757.0.html )
OR
( http://dejgaming.com )
OOOOR read on ;)
Follow these steps:
*Start up GTK
*On the grid lines draw a Box as seen in this pic below.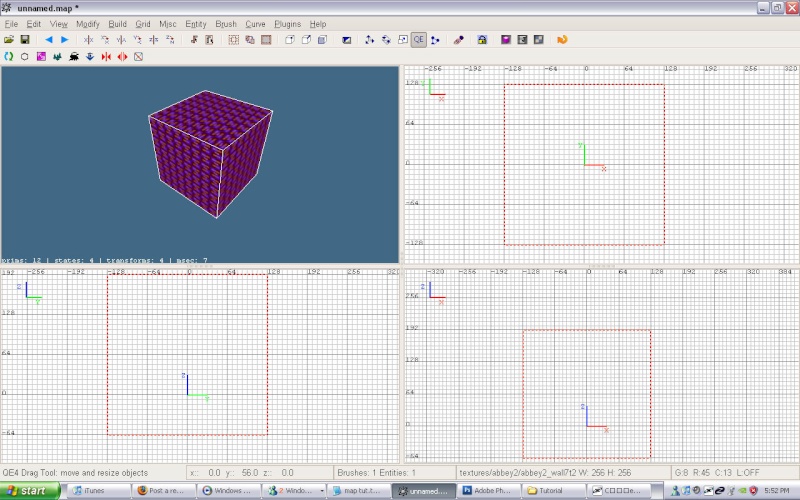
*Then click on the hollow tool while the box is selected to make a room.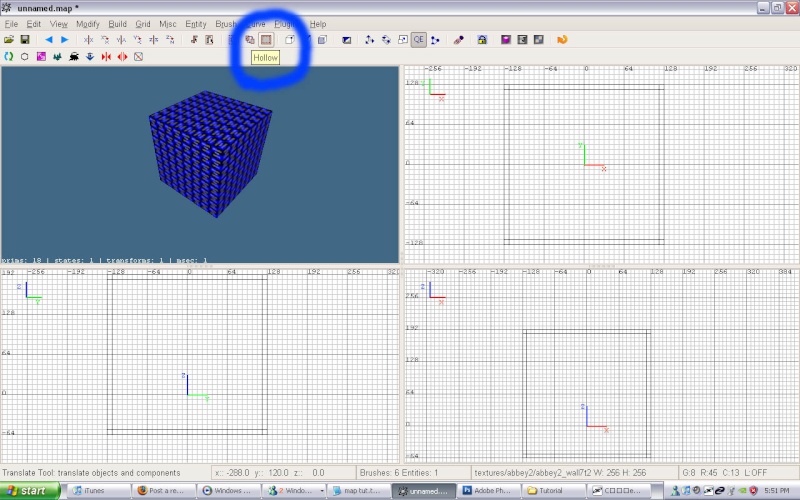
*Then move the camera into the box by right clicking the 3d view and then moving with the arrow keys. Select the walls by holding shift and clicking them. and then press T to bring up the "Texture Browser". click on "abbey2_wall7t2"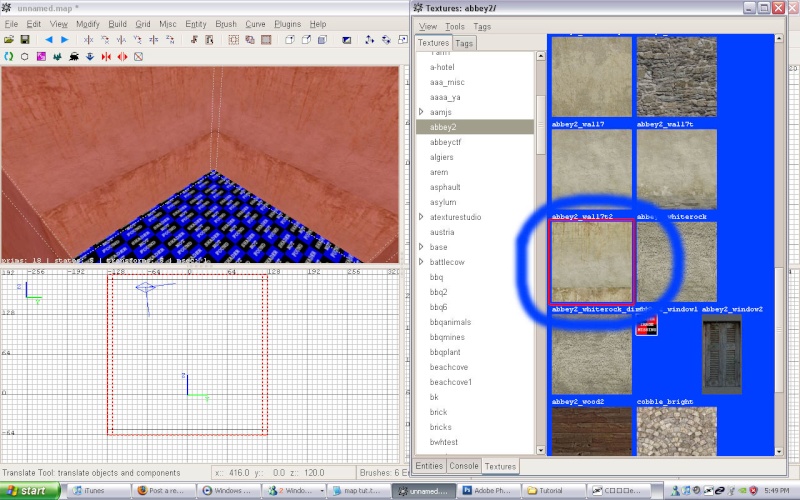
*Now get out of the texture browser by pressing T or Esc (Dont deselect the walls)
Then press S and it will bring up the "Surface Inspector"
and click under brush "Fit".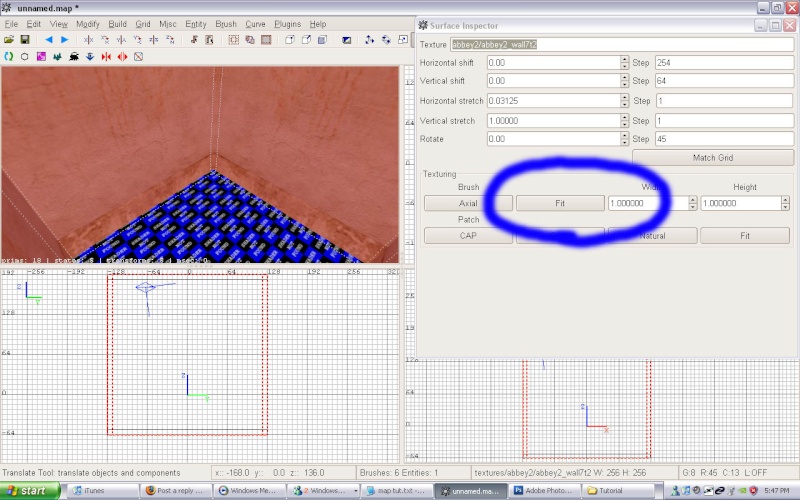
*This leaves the floor and the roof. get out of the surface inspector and deselect the walls. Now select the floor and texture it "abbey2_wood2"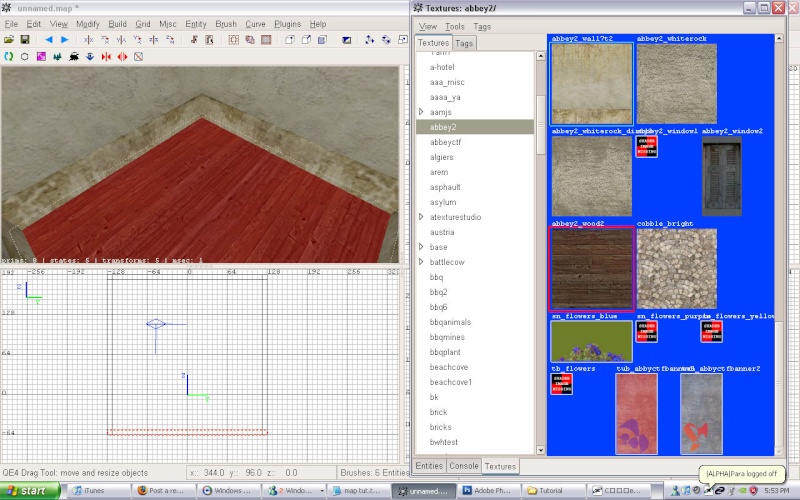
*The final step is to texture the roof. Deselect the floor and select the roof. texture it with "abbey2_blinds1"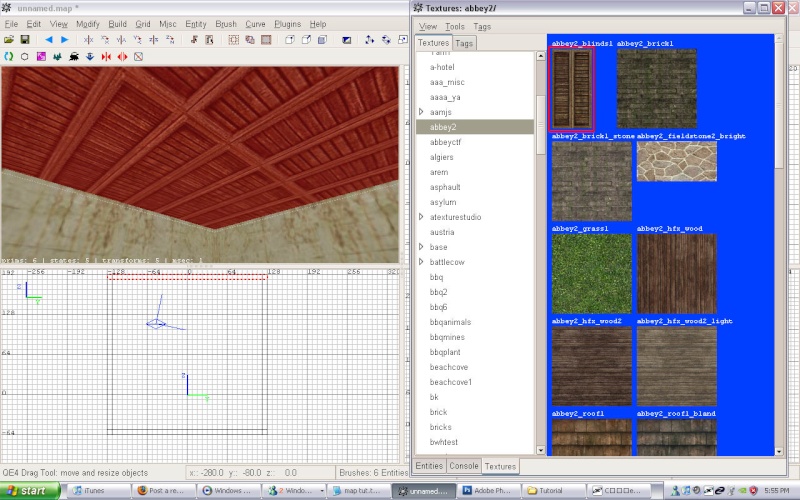
*Thats It with the texturing stage...Now add a spawn point by right clicking -->info -->info_player_start
*After that its ready ro run in urt...Save the file and call it room1, save it in "C:\Program Files\urt41mapping\q3ut4\baseq3\maps" . All you have to do now is go to Build --> Q3map2:(single) BSP- meta
Then go into "C:\Program Files\urt41mapping\q3ut4\baseq3\maps"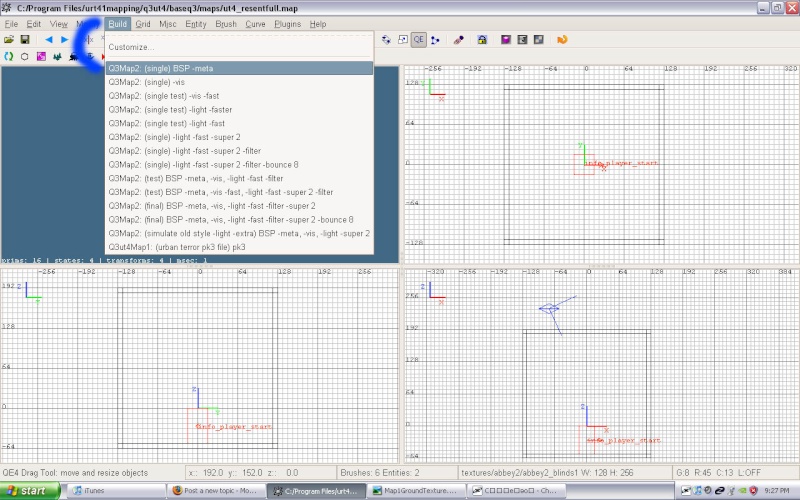
Step7.
Ok now we have to make a pk3...A pk3 is basically a .zip file just with the .zip changed to a .pk3. The pk3 consists of: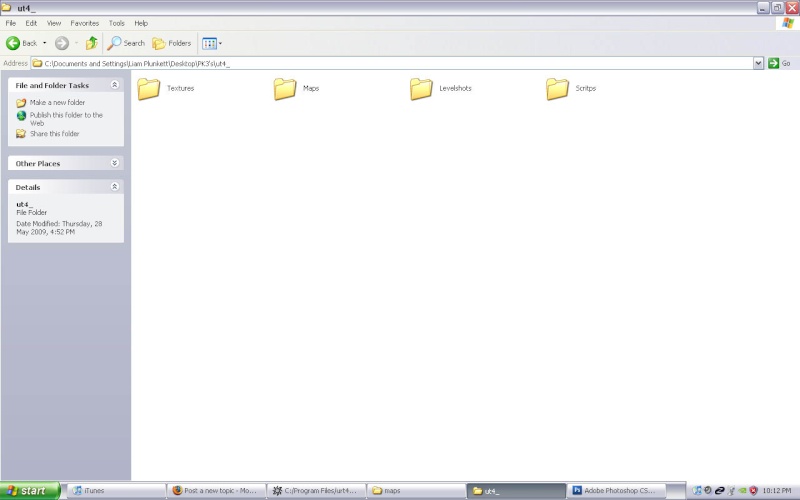
A folder with the map name containing:
Map - where you put the .bsp file
Scripts - where you put custom .shader files
Levelshots - where you put the loading screen .tga or .jpg
Textures - Where you put custom textures
Now all you need here is to shove the .bsp file in the pk3...
select all the folders and then with winrar: Add to archive ---> room1.pk3
or with .zip go to the folder that contains them (room1) and select it. Then send to zip and change the zip extension to a pk3 extension.
Step8.
Now shove room1.pk3 in "C:\Program Files\urt41mapping\q3ut4" and run urt.
To run your map in urt open the conlsole and type /map room1 then hit enter.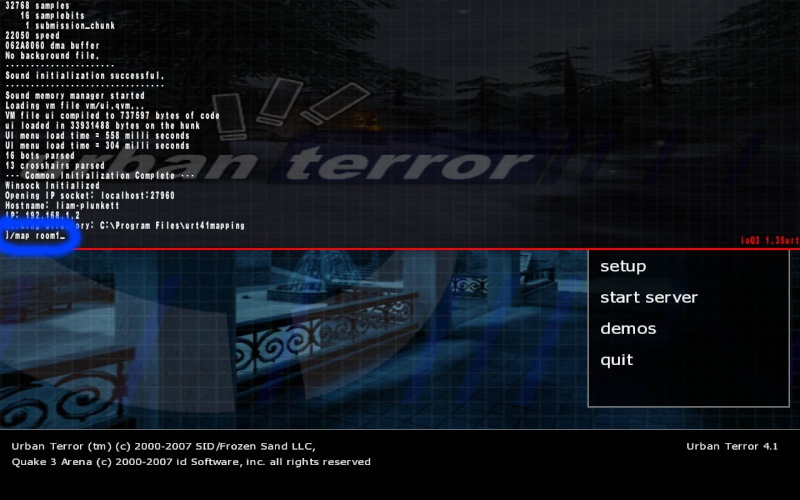
you map should look something like this...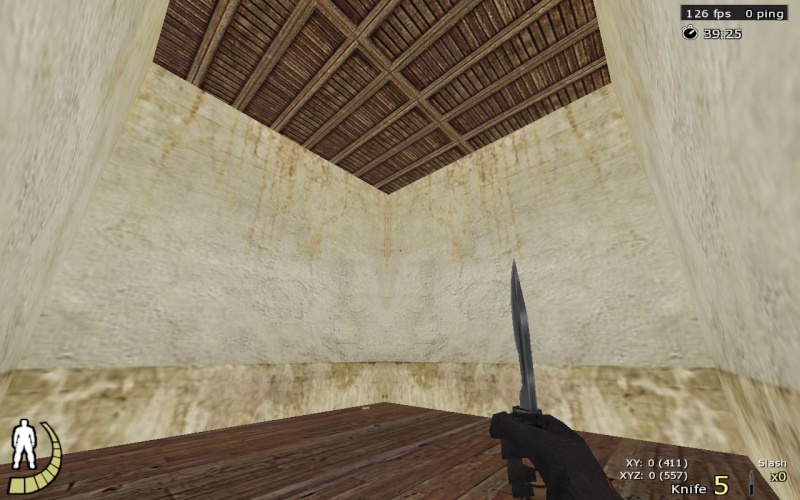
WOW YOUR OWN MAP!
Ty for reading my tut guys
hope you like it...If any pro's see any flaws in this tut please point them out!
SubJunk - Rocket teh ninja -
-
-
CommentAuthorScone
- CommentTimeDec 24th 2009
Man,i love mapping, great guide krasus mate. -
-
-
CommentAuthorRocket
- CommentTimeDec 24th 2009
Yea, I just started learning yesterday lol. Seems like fun.
SubJunk - Rocket teh ninja -
-
-
CommentAuthorRoboBunniE
- CommentTimeDec 24th 2009
na, not my thing... i perfer to jsut do the playing, all that work... takes all the fun outta it!
-
-
-
CommentAuthorRocket
- CommentTimeDec 24th 2009
For some people yes Bunny, but for us freaks of nature it is just as fun to make the maps, and have people play on them, as it is to play on them ourselves =D
Not that I've actually made a map yet... but I have played on maps Khao has made and one of which I designed, so close enough xD
SubJunk - Rocket teh ninja -
-
-
CommentAuthorRoboBunniE
- CommentTimeDec 24th 2009
dude, awesome!! thats cool for u!, ur so special! -